
Buying a Used Crawler Excavator — How to Inspect Structural Components for Fatigue and Cracking
So, I agree with what I remember about it, and I was confident that a dealer I’ve known for a long time had placed a decent amount of money on a unit that split at the boom foot before close season so that both boom sections and his counter weight plate were factory sheen and his pics taken under the soft light of an open shed were fine in any reasonable man’s eyes.
The sandwich was in my left hand and the flashlight in my right and while that isn’t a dignified way to hone in on a boom foot, that’s how you do it when you’re one man in a gravel yard and you’ve got 40 minutes until the owner returns from lunch and begins asking what the heck you think.
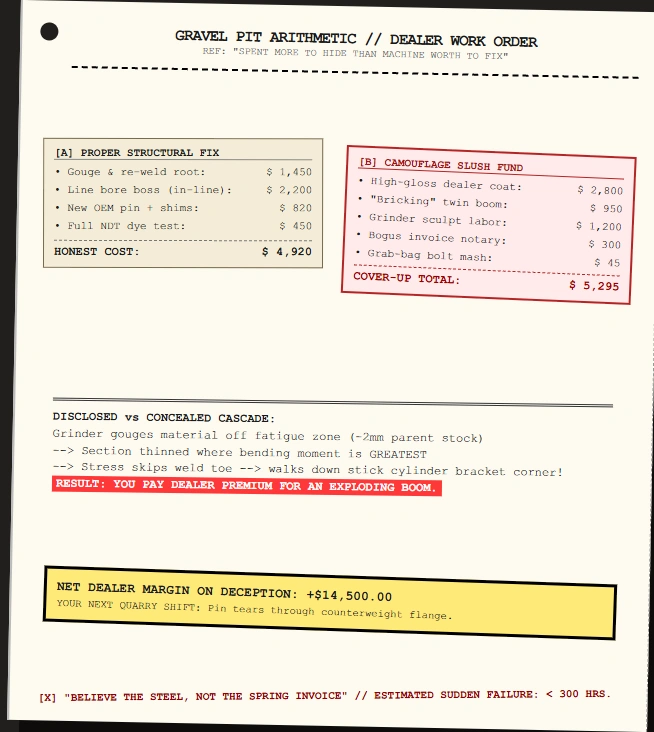
That machine had been real-time worked by the seller and then had money spent over it to hide it – which is more than the machine would have cost to repair. I’ve seen that before numerous times and when I see clean structural paint, my thoughts immediately begin to race. Inspection begins where the pictographer stops–the weld toe, the bolt hole, the change of section–there is no reason for the man with a camera to kneel.
Wherever a fabricator had to stop one plate and start another, the stress crowds in a smaller area and the value will be well in excess of what the drawing was assuming for the parent material, specifically this happens at the change of section, the toe of a weld and the edge of a bolt hole. You can read a hundred spec sheets, and never learn this. It’s learned within a season by your fingers.
Data sources for the table above:https://blog.ritchiebros.com/heavy-equipment-inspection-checklist/
Each zone is located on a load path, there are section changes and the areas are difficult to access, ALL because these are the areas sellers want to capture in photos, NOT the carbody join.
Once around the entire circumference of each ear (on both sides of the boss, top of the ear, underside of the ear) run a finger along the weld toe; it is also on the underside that matters, as this is where a crack will occur when the ear is under tension and is the area least often tackled by wipers of grease.
The sound toe has the characteristics of a smooth fillet-type run-out, no pronounced edge to get stuck on to parent plate. Diagnosis: a tired toe is sharp and that is all the diagnosis is; weld-toe undercut removes the section right where the bending moment is greatest on the boom foot of a crawler excavator and creates a thick plate with a notch cut on the edge of it.
Place a bar across the top of the pin boss and load up one way and check how far (if any) the boom moves until the pin takes up, a pin with a sound boss will move slightly one way, but will also feel “squat” and solid when loaded the other way, whereas a worn pair of pin and boss will move in either direction and the joint movement will lag slightly before transporting the load.
Rotate the machine through three stages of boom travel – retracted, mid-stroke and extended – and strike the boss with a brass drift and listen for a rattle behind a double knock on each of these stages of travel; if the bore sweep has gone oval it will have a different sound.
With this hour so marked on such a machine, a little rock at the boom foot is quite usual and it is not a fault that should be noted; a rock like that, with a knock at only one position in a machine like that would mean that one side of the bore was running dry and a new pin would not take the trouble. Of course, the majority of customers do not reach this stage as standing next to them is the boom foot positioned at chest height, while the salesperson is explaining the undercarriage.
It is above where you look, it is the side of the compression arm, it is covered in dried up clay and this is also the last place where a fatigue origin shows up, after you run a bucket which is too large for your arm for years.
Next the counterweight mounting plate.
That is a load path plate not a cosmetic plate and the plate that you need to ‘read’ is that marked with bolt holes. Elongation is subtle and obvious: The hole begins and appears oval in the direction of load, the face of the washer is not concentric with the hole and a reddish-brown fret dust is found after you unscrew the bolt under the washer.
The fact that all the bolts are the same brand, type, thread exposure, etc. proves that they were all carefully positioned during assembly, and a factory-grind bolt set even proves the same regardless of colour difference in the brand stamps on the heads, no bolts have been replaced after a move, and that somebody grabbed whatever to fit rather than what the drawing specified.
Finally, the stick cylinder mounting ears fail in a manner folks don’t anticipate: they fail after a bucket change and/or thumb install–with no hard dig–due to out-of-plane bending of which the ear was never sized; the ear-to-bracket weld in the toe and their crack walks down the ear corner.
One “qualifier” on all the above. These readings are held where I took them: on level hardstanding with the boom down and there is no heat in the hydraulics. When parked on soft ground that same machine will pass, with a bucket full with some of those cracks closing and all the clearances you measured will change, so take measurements unloaded and don’t be afraid to say that’s when the machine was unloaded.
Disclosed Repair–Buried Damage: How to Read the Evidence Trails
A disclosed repair and a concealed repair are the same at 6 feet in both appearance and feel but different at 6″ in both appearance and feel.
When a grinder is used to prepare a weld for examination or painting, there will be a set pattern of sculpturing scratches all in one direction along the weld bead and continuing into the respective adjacent surface, since the operator was working to a surface. A grinder was found to remove the leaves’ swirl marks which cut off sharply at one line, and to cut diagonally across the original plate swirls and to thin the plate at all places where no thinning was desired.
If the same plate around the site are measured to be at one thickness and the ground zone is measured thinner (straight edge to the edge or a fingertip feel for the step), material must have pulled-off where it shouldn’t, and a repair that required the removal of the section in a fatigue zone moved the problem, rather than fixed it.
The easiest indication in the yard is a hard tape edge where it matches a structural plate, particularly if the edge is along a part where there is no reason for a paint edge, and the number of layers under the edge show as a colour step and/or a thickness step even if this is not visible to the naked eye but may be detected by prodding with a nail. Overspray on The Hose, pin collars, mounting bolt threads and seal lips are all the same message—painting a machine is done correctly involves masking those things in question, otherwise, they were painted after the assembly; in a rush.
Taking the time to write this reminds me of an illogical incident from years back: a boom was re-welded, brushed and painted at the repair and the other boom bricked to match so the repair wouldn’t be noticeable—and that is the easiest way to tell, since a factory finish will wear out differently than a patch.

Promises are made to “close at invoice” and a date was assigned–but the actual record tells the tale: fretting, dents, wear rings surrounding a re-bored boss and so forth pile up over the years, at a rate that no invoice date can counter. When the fade says “several seasons ago”, and the invoice says “last spring” believe the steel.
Days, weeks, yards and bad coffee await you if you run it yourself and most pieces you get your hands on will have been run through a dealer prep to cater for queries that don’t happen. A short cut approach is to begin with machines whose structure has already been opened out, measured and written down–Boss clearance measured and recorded cold and unloaded, weld toes photographed in raking light, bolt grades confirmed against the machining group, repairs documented using a scope, not a date.
Request a quote on the machines you’ve inspected and read the record of work carried out on their structures before leaving for a trip or alternatively, check the record of work done on the structures of machines in stock and take the same flashlight with you to go to a machine that doesn’t have as much to hide.
Your hand will know the way! It usually does.